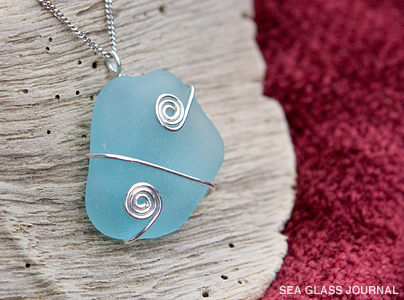
A Simple Wire Wrap Sea Glass Pendant
How-to create a wire wrap sea glass pendant instructions
For a sea glass jewelry idea try a simple wire wrap pendant like the one on the left. With a few basic wire wrapping tools, some wire of your choice and a piece of sea glass that you have found, create a simple piece of jewelry that will certainly garner attention from your friends.
How-to instructions shown below...
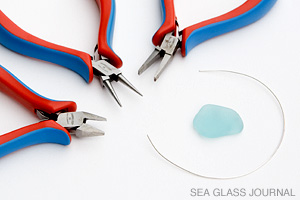
Step 1: Selecting Tools & Materials
The three tools suggested for this sea glass project are wire cutters, round nosed pliers, and flat nosed plier.
The wire selected should be strong enough to support your sea glass pendant on a chain. If you are using sterling silver, for example, I recommend using 18 gauge or 20 gauge half-hard. Although you can use any style it is easiest (and more forgiving) to use round.
TIP: If this is your first venture into jewelry making with sea glass, use a piece large enough to handle easily.
Step 2: Determining Your Design
At this point you need to visualize a design that both complements your piece of sea glass and holds it securely in place. You will then have to determine how much wire is required for the design. It will become easier to judge the required length as you become more skilled but in the beginning you can use a piece of string wrapped in a similar manner to determine the length. Just remember to add extra length to account for the bail and the curls.
TIP: It is always best to cut more than you think you need. Discovering later on that you don't have enough wire will have wasted your time as well as material.
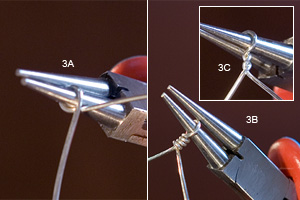
Step 3: Making the Bail
At this point you will need to determine the bail location. For this pendant design the bail will be located approximately 1/3 from the right end of the wire.
The bail is to be created looping the wire around one jaw of the round nosed pliers (3A). Be sure the bail loop is large enough to allow the clasp to pass through easily.
How you finish the bail is up to you. An easy way is to twist the wire around itself (inset 2C). A more visually pleasing style is to wrap the shorter side of wire around the other end three or four times (3B).
Whichever style you chose the shorter length of wire remaining will be where you make the first curl in the next section.
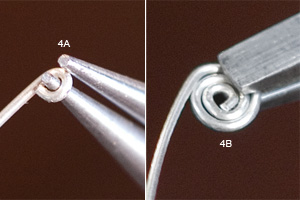
Step 4: Curling the 1st End
Grabbing the shorter end of wire with your round nosed pliers, curl the end into a closed loop (4A).
From here you securely grab the loop with your flat nosed pliers and continue curling the wire around itself until you have created the desired size curl (4B).
TIP: It can be easier to wrap the loose end of the wire around the loop rather than trying to create the curl by twisting the loop with the pliers.
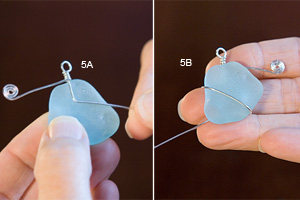
Step 5: Starting the Wire Wrap
Now placing the wire on the back of the sea glass, bend the wire at the points where you will want both ends to wrap around the front of the glass (5A).
Now flip both the piece of sea glass and wire and continue to wrap the longer end around the front and back at the desired locations to ensure a secure hold (5B).
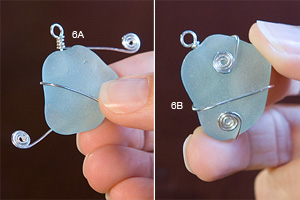
Step 6: Curling the 2nd End & Finishing Off the Wrap
With the remaining end of wire determine how much length is required for a final wrap around the front of the sea glass and to create the desired size curl that will finish the piece. Cut off the excess wire.
TIP: You have a little latitude in judging how much wire is needed. You can always make the curl a little larger or small depending on how the final wrap progresses.
Complete the curl by following the instruction in STEP 4.
Finish your piece of jewelry by wrapping the final curled end around the front of your sea glass.
And that's it!
Now adorn your newly created sea glass pendant and enjoy showing it off to your friends!